BCB – right away for a new start

We announced recently that the the group was looking for a new owner to take on BCB.  We’re very pleased that Damian Ross has agreed to take on BCB in its entirety, with a plan to extend it to a continuous circuit, which will open up new operational possibilities.

It’s great that a home has been found and even better news that the layout is passing from group ownership to be owned by one of the group who created it.

Much of the existing BCB content on RMweb has been combined into one (very long!) topic on RMweb, start here if you want to read the story so far or here to follow what Damian has planned for the future of the layout.

Spring Time in the Black Country

One of the signature locos of the Black Country Blues (BCB) fleet is 47335.  A TOPS numbered loco in two-tone green with full yellow ends livery sets the time and as a (then) Bescot allocated loco, it sets the place fairly well too.  With the initial rush to get the stock for the layout exhibition ready it entered service with a quick EM conversion (the existing Bachmann wheels pulled out to EM), a renumbering and a bit of weathering.  Unfortunately, it has proved to be a little unreliable, partly due to the wheels fouling on the brake gear and partly due to the known issue with some Bachmann bogies causing them to rock on the centre axle.  For a while now the plan has been to use some Penbits sprung bogies to resolve these issues.  I started to fold and solder the bogie subframes over a year ago and got as far as preparing the bearing carriers that allow the axles to move over any track irregularities.  Like so many of my projects though, it stalled while I did something else.  When I picked it up shortly after BCB’s appearance at Wigan in October, this was where I was up to:

29491269574_779fe1d05a_o

Cautiously following the excellent instructions provided, the next step was to assemble the bolsters which connect the subframes to the chassis (and contain the secondary suspension).

30252616972_bfe329d678_k 30230372832_ae1d19d434_k

So far, so good; at this stage nothing irreversible had been done to the loco, but to move it on, the drivetrains from the Bachmann bogies needed some modification, so I had to decide whether to proceed (and in doing so, give myself a deadline to have it ready the layout’s next exhibition appearance).  Here goes nothing…

30339326502_045aa6a217_o

I’m guessing that invalidates the manufacturer’s warranty!  More modifications followed, and a small task that I found dis-proportionally time consuming, to open up the brass bearing that clip into the plastic bogie housing to allow the axles to travel.

30725098096_6a3ae0d1f6_k

I got there eventually, allowing the bogies to be test assembled.

30129641804_6948c29b40_k

They stayed like this for a while as I got distracted by some wagons, but next on the to do list was to add the springs.  Each bogie has eight springs, four primary springs that act on the bearing carriers in the subframe and four secondary springs that connect the bolster to the subframe.

31181075702_02ec67b8b6_k

31331247805_bd5f52a5eb_k

I had some difficulties with the primary springs and am planning to replace the two individual springs with one continuous spring on either side of the bogie – just waiting on some suitable wire to arrive.

Just over a month to go before the loco is required in service; no pressure then…

The Mill Motive Power

Jason has been working on some additional locos for The Mill, firstly a Judith Edge 88DS.  As can be seen, it is all but complete now apart from glazing, painting and adding weight.

post-9707-0-51213200-1480056110 post-9707-0-33884900-1480056170

Jason continues: “It is actually the third Judith Edge kit I have built, the first being started over five years ago and then put on the back burner when I discovered that they weren’t built until after my modelling period. However, recently I have dug it out and moved forward to the point where the end is in sight and who knows, maybe we can have an early 70’s mad half hour at the end of shows. It’s a Thomas Hill Vanguard and if anyone is in doubt about how long it has been sat on the ‘to complete’ pile, it appears in one of the first posts on my Bacup thread!

post-9707-0-35059100-1480056514

And finally, a loco which is unlikely to see much use on The Mill, an L&Y Class 23. I have owned a second hand OO Works one for a number of years now but it ran like a crippled tortoise. At the 2015 Expo EM North, I managed to pick up a George Norton kit of one for £20, only to later discover that the boiler was missing. Now I could have got a new boiler from London Road but chose instead to build up the chassis and mate it with the RTR body. This has involved shortening the chassis, adding compensation (not catered for in the kit) and adapting the High Level method for the brakes so that they are removable. It has turned into a rather enjoyable but sometimes frustrating labour of love but is getting there now.”
post-9707-0-44729800-1480056981 post-9707-0-16179900-1480056931

Fryers Lane – ExpoEM North 2016

It had been a year since I exhibited Fryers Lane (as a work in progress) at Scaleforum in 2015 when, in September 2016, I had the opportunity to exhibit the layout in a much more finished form at ExpoEM North.

Here is a brief recap of how the layout came about and a reflection on how various elemnts of it performed.  I’ll start by saying that I’ve had a P4 itch to scratch for a while, I’d also been slowly building up a collection of air braked freight stock and a few locos to suit a late 80s setting.  The Scalefour Society’s Standard Gauge Workbench provided the impetus to put these two things together in a layout that would be easily transported and not require too many operators.

As well as testing out my skills with the finer tolerances of P4, there were a number of things that I wanted to try out for future layouts and this seemed a reasonable place to try:

  • Steel rail
  • Servos driven turnout operation
  • Foam track underlay
  • Hex Frog Juicer to switch crossing polarities
  • Cameo layout design on a single monocoque baseboard
  • LED lighting (integrated into the board design)

15922835400_7815fa32c5_k

I’ve found steel rail challenging at times, but in use, it is (so far) proving to be very reliable and require little cleaning.  Yes, I did find soldering droppers to it to be a bit of a pain and yes, filing vees and switch blades takes a little longer, but on reflection I think I’ll be using it again in the future.  Interesting quirk we noted on Sunday of ExpoEM North was that the nickel silver rail in the fiddle yard was filthy, enough to cause locos to stutter, whereas there were no such problems on the steel.  I wondered if the different properties of the materials was somehow the cause of this?  Easy enough to deal with though.  The Frog Juicer works well but does have a slightly annoying tendency to arc for a split second when a wheel runs onto a vee of opposing polarity.  For this reason, I’ll probably switch (pun intended) back to more conventional methods next time as I feel this visual impact negates any benefits derived from (slightly) simplified wiring.

The servos are great.  Cheap, reasonably easy to set up and no issues.  Definitely on the list to use again.  Can’t say the same for the underlay.  This was the black foam stuff from C&L.  IMHO, it is too soft and has a bit too much give in it.  Back to cork (or maybe thin ply or MDF next time I think).

29661100532_846ad25011_k

The “cameo” baseboard has worked well; but the dimensions of this board are approaching the maximum practical size for a board that can be handled without assistance, particularly within the confines of a 200 year old cottage with its low ceilings.  It’s on the heavy side too; although that may partly be down to my use of 12mm ply (because I had a spare sheet left over from another job).  I might use something thinner (9mm ply?) for all but the board ends if I was doing it again.  The lighting probably deserves a separate blog post, as it was quite a journey, but overall it’s working well.

So, what next?  I don’t subscribe to the view that “a layout is never finished”.  I think it’s important to aim to push your standards, but know when a particular project has gone as far as it can go. Fryers isn’t there yet, there is more scenic work to complete, namely to fill up the skyline along the back of the layout and to improve how hidden the exits to the fiddle yards are.

29773542505_7e83007fda_k

Beyond that there is (always) the tempting prospect of extending the layout.  Another board at the right hand end would allow me to model the level crossing, the signal box and maybe even the goods shed (although that would be likely to be disused).  On reflection, I think if I wanted to do that I’d be better starting again, with new baseboards of a different design as a longer layout would benefit from deeper baseboards.  That would then start to take me away from the original aim

For various reasons, I’d slightly gone off the idea of exhibiting and was thinking my next project would be a home based layout, not intended for the exhibition circuit.  However, exhibiting at ExpoEM North reminded that I do enjoy doing shows and of the advantages of small layouts which can travel in a car and only need one or two additional operators.  One idea I have buzzing around in my head it to build alternative modules (of similar dimensions to Fryers) that utilise one or both of the existing fiddle yards, now I have some that actually work!

Where are they?

You may have noticed that it’s been a bit quiet on here; however, since the blog still gets a steady stream of visitors (thanks for looking by the way), this post will act as signpost pointing to where you can find the group’s current internet postings:


Half an hour at Foundry Lane

A few photos of 20073 shunting the sidings at Foundry Lane, here we see it arriving with a brake van, there being no inbound traffic on this afternoon’s trip working

After dropping the brake van in the sidings, the loco headed off to the steel terminal, propelling a bogie bolster which had arrived on the morning trip and returning with some empty wagons which had been unloaded during the morning

The brake van is collected and added to the back of the wagons.  The loco then ran round, ready for the return working

The trip working then left, heading back towards the mainline

We grab one last photo before she disappears under the bridge and into the gloom beyond

The next exhibition appearance for the layout is Expo EM North on 15th and 16th September at the new venue of George H Carnall Leisure Centre, M41 7FJ.

Black Country Blues – developing the project proposal

For anybody not following our progress over on RMweb, John’s notes below describe the process which the group followed to determine the outline plan for the layout and the steps taken to turn the concept into a project proposal.
Black Country Blues – An Industrial Odyssey

Our introduction to the project began with a round-robin note from Chris (2manyspams) asking the innocuous enough question, “Anyone up for this?” The “this” being a submission to the RMweb Layout competition and to a man, all those asked said “yes”.

So having re-assembled the “team” that has all had a hand in building “New Haden Colliery”, the next question was, “Er, what do we have to do next?”

Well, that was simples! There were these criteria to satisfy, by answering the following questions:

  • Who was in the team?
  • Which scale/gauge was to be used?
  • Where is the layout set?
  • When is the period of operation?
  • What makes our entry different/unique/inspirational?
  • Were there any special skills required/employed?
  • Then add a proposed layout plan and approximate dimensions
  • Plus some images, or artwork to back up the scheme.

“Ok, we could answer question one, but, what shall we put in our proposal?”

Hey, let’s try brainstorming by e-mail.

Over 24 hours, the replies had included the following suggestions:

  • Appeal to wide audience, be unique and inspirational
  • Diorama, unusual prototype, industrial atmosphere, maybe with canals
  • Midlands location, more than one time period for operations
  • Achievable finescale modelling, encouraging others to have a go
  • Sectional approach, to spread construction, flexible and quicker
  • Handmade track (probably EM gauge) and scratchbuilt structures
  • Include some research elements
  • Use our existing rolling stock and add simple new builds and conversions

So, our objective:

What we needed was an idea that combined as many of the above suggestions as feasibly possible; something unique and inspirational, an unusual midlands location that was immediately identifiable; a diorama that could be built to finescale standards, using a modular format of construction and be finished into a working layout within a six month timescale.

Now, it’s well-known in the group that I can always be relied upon to come up with an idea. The trouble is – it’s often daft as, an ashtray on a motorbike! However, within 24 hours of “getting the band back together”, to use one of Damian’s favourite phrases – I’d fired out a daft idea. A single A4 page with the following sketchy title: “In search of the Midlands”.


The next steps in the “birth of an idea” and how we got closer to where we are today,

The “Starter for ten” – In Search of the Midlands repeated the competition information, added a précis of the 30-odd replies and stated the general objective; this was followed by a take on an idea for a Midlands-based diorama, the aim of the concept and a brief technical description all in just 100 words.

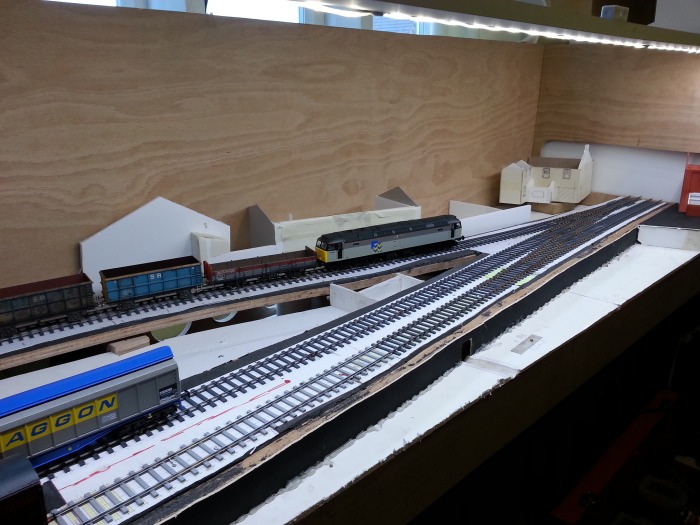
The immediate replies suggested a meeting (at Barton Marina, 3rd May), where I presented the concept “In Search of the Midlands”, backed up by a series of rough drawings. There was an introduction to “a layout taking a different approach to railway modelling”, which outlined the relationship between the contemporary railway and its Victorian roots. The importance of maps in the creation of the railway system and some ideas for a model diorama 3168mm (12 chains/264 yards) in length to demonstrate the idea were all included.

The concept was good, The plan looked ok, but it would have made a poor model railway.

Also, around the table, it was obvious that the majority of the team were keener on a “Black Country” subject, rather than the vague Midlands/Cannock Chase general idea that I had started off with.

Back to the drawing board and a week later we all sat around a different table and this time I’d brought a longer sketch, 4224mm long, containing a better proposal. But as the evening progressed, it was obvious it was still not quite right. However, it was whilst the discussion progressed that specific Black Country structures were discussed and the predominance of Staffordshire blue bricks in their construction.

In an e-mail next day, somebody used the phrase “Black Country Blues”; a phrase that not only resonated with the infrastructure of the embryo scheme, but also the atmosphere of the area itself in the core era we were attempting to portray. Here was the banner, upon which to hang our proposal.

Whilst all this scribbling on sheets of paper had been taking place, Chris had been formulating the proposal document to send to the judges of the RMweb competition. And Geoff had been wrestling with Templot, trying to create a trackplan, which would satisfy both the aim of showing the relationship of Victorian engineering to the contemporary railway scene and provide a platform for interesting operations.

Chris produces proposal documents for a living, so he took all my woffle, all the e-mails and extra information and produced a professional six page document describing:

  • Who we were
  • The scale/ gauge/ period modelled and prototype area
  • What made the project different and stand out from the crowd
  • Our portfolio of relevant/special skills
  • An outline of the project we intended to build – scenic section now 5280mm long!
  • And finally a trackplan sketch and a projected budget.

It is a beautifully produced document, which was submitted by e-mail to make the fast approaching deadline. I’m sure it was Chris’s professionalism that won the RMweb competition for the Staffordshire Finescale Group, along with that catchy title – Black Country Blues! (a title now featuring lyrics by Stubby, music by Trisonic and backing vocals by Oldddudders!).

On the scale/ gauge/ period and prototype page, there is a series of thumbnail pictures, featuring bridges, canals, a signalbox and a sketch map of the Black Country. The special skills portfolio page also contains thumbnail pictures of our layouts; New Haden Colliery, Treneglos, Foundry Lane, Diesels in the Duchy and “Once upon a time” (which is again on the back burner for the next eight months!).

Following the notification that our proposal had found favour, another presentation followed, this time to Steve Cole and John Emerson, to seal the deal.

What next?

“More in a bit, our kid”  . . . . .

Find out much more about what we are up to at: Black Country Blues – the winning RMweb Project Layout proposal

Black Country Blues

I’m really pleased to say that our project layout proposal for RMweb was succesful and that the group will be working on this in the coming months.  Obviously, this means that some of our other projects will take a bit of a back seat for a while, but we all have every intention of coming back to those as time permits.

Progress on the project layout “Black Country Blues” can be followed on RMweb and will also feature in British Railway Modelling magazine and on the Model Railways Live website.

We will continue to post updates (both on the RMweb project and other activities) here too.


Relic Hunting for Low Level

From time to time I’ll search for Wolverhampton Low Level related stuff on e-Bay.  The platform ticket (which is the avatar I use both here and on RMweb) is one recent example of this.  The photo below shows this, along with a couple of other recent finds.

The June 1971 edition of Railway Magazine was sourced following a tip-off from Neil Rushby that it contained an article about the (then) imminent closure of the GWR mainline between Low Level and Snow Hill.  While the article itself doesn’t really tell me much I’d not read or seen elsewhere before, it’s nice to have and really helps to set the scene for the layout.  It’s interesting to read something written at the time the layout will be based, rather than the more recent sources.  It is accompanied by a couple of photos, one of Low Level with the bubble car stabled in one of the centre roads and an 08 in the former up platform (with a varied selection of parcels vans and a couple of vanfits).  The other shows the bubble car pausing for custom at Priestfield on its way towards Snow Hill.

The pink sheet of paper (actually there are two sheets stapled together) is a BR handbill (which also dates from 1971) showing the timetable and ticket prices for the Low Level – Snow Hill passenger service.  Six weekday departures left Low Level bound for Snow Hill (with an additional 13:50 departure Saturdays only).  Journey time was 32 minutes (compared to 35 minutestoday on the Midland Metro – although that includes additional stops and takes you right into the centre of Wolverhampton), calling at Priestfeild, Bilston, Wednesbury, Swan Village, West Brom’, Handsworth, Langley Green and Hockley.  There was of course, we are reminded “NO SUNDAY SERVICE”.  A second class day return would cost you the princely sum of 40p; a one month season ticket £7.20.

One which got away recently was a 1971 Locoshed, mainly to confirm the Bescot 08 allocation at the time; I’ll keep looking.  The plan is to display these finds on the fiddle yard screening of the layout – assuming I get the time to continue with the layout build since the arrival of the new family member at chez Forrest:

P4 Track Co Turnout

I had a couple of days off work this week and thought this might allow a bit of modelling time.  It did, but nowhere near as much as I would have liked.  The current list of tasks for my WLL project is broken down into rolling stock, buildings (& other structures) and track.  Having done some work on buildings and rolling stock recently I thought maybe it was time to look at track and I managed to find a couple of hours to have a go at putting together one of the P4 track company turnout kits.

I had high expectations for these products, in fact it would be fair to say they were one of the things which attracted me to building the layout in P4 rather than EM.  They have small pips on the timbering which allow the chairs to locate in the correct position.  I’ve not used steel rail or plastic timbering before and have previously made up my own common crossings and switch rails so these kits are quite different to anything I’ve built before.  The first one (of three which I’ll need) is a B8  left-hand turnout, which will form the junction of the former goods avoiding lines at the rear of the layout.

Overall I found construction to be a quite a pleasant experience, although must admit I struggled a little to follow the text of the instructions (I’m never good with instructions and was confused further by my LH kit having a RH template in the pack, as the astute will have already noticed in the photo above!).  Despite the pips on the timbers, a set of gauges are still required to ensure accurate alignment of the rails, mine came from EMGS (who can supply these to suit 18.2mm and 18.83mm gauge to members of the society).  As designed the kit is intended to make a straight turnout, but I found it easy enough to introduce a gentle curve to match the drawing I have prepared in Templot (which is based on a scan of a 1:500 plan of the station).  I suspect this may be more of a challenge when it comes to the C10 turnout for the down platform though.

At this stage there are still some details to add.  The detail in the chair components is far superior to the C&L components I’ve used previously and overall I’m very impressed.

Testing with a spare coach bogie seems to confirm all is well; hopefully I’ll find a little time over the weekend to add the remaining chairs.  I think it probably took about 3 hours (excluding tea breaks) from opening the pack to get to this stage; probably another hour on top of that to add the remaining details – although this should reduce as familiarity and confidence with the product increases.  At £35 each they aren’t cheap, but as I only need a few, I think the advantages in prototype fidelity and ease of assembly do make them good value.